This page is a step-by-step guide on how to post a job in Handshake. This guide is meant for on-campus supervisors only. If you are an external organization looking to hire K students please click here.
Please follow along and use the screenshots as a visual reference and complement to the text explanation. The steps below assume you have already created an employers account in Handshake. If you do not have a handshake employers account please contact Richard Sylvester in the CCPD at richard.sylvester@kzoo.edu for instructions.
Step 1: Click on jobs
This screen is the home screen you should see as soon as you sign into your Handshake Employers account. On the left side of the screen, click ‘jobs’ to go to the jobs page.

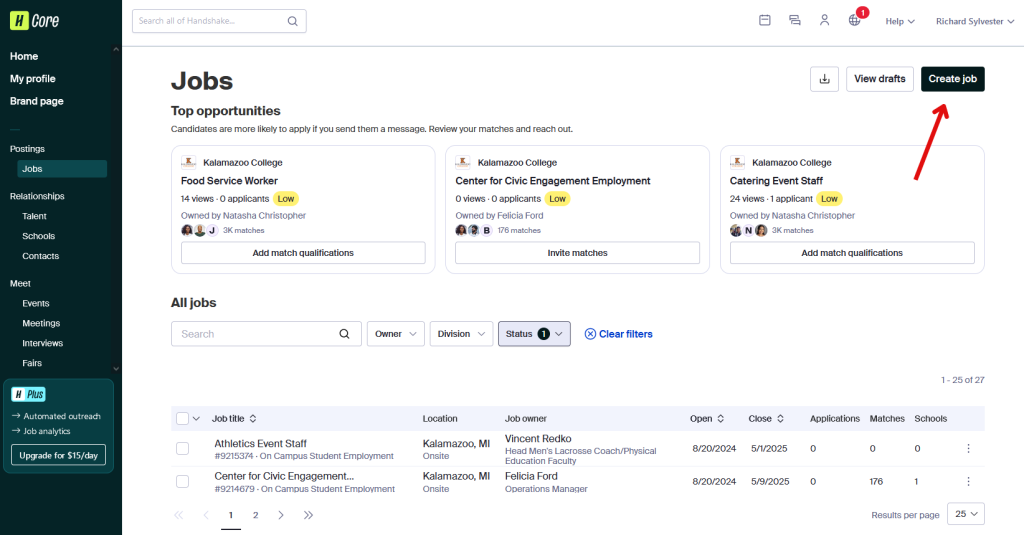
Step 2: Click on create job
This is the jobs page. From here you can view all posted on-campus student jobs. To filter and sort through all of the posted jobs you can use the ‘Owner’ filter to sort through jobs posted by you or others. The ‘Division’ filter will allow you to choose the various departments across the college that post jobs and the ‘Status’ filter allow you to choose between jobs that are ‘Active’ and open for students to apply to, ‘Not posted’ for jobs that are in progress of being drafted, and ‘Closed’ for jobs that are expired and closed and cannot be applied to. To create a new job click ‘Create job’.
Step 3: Create a job description
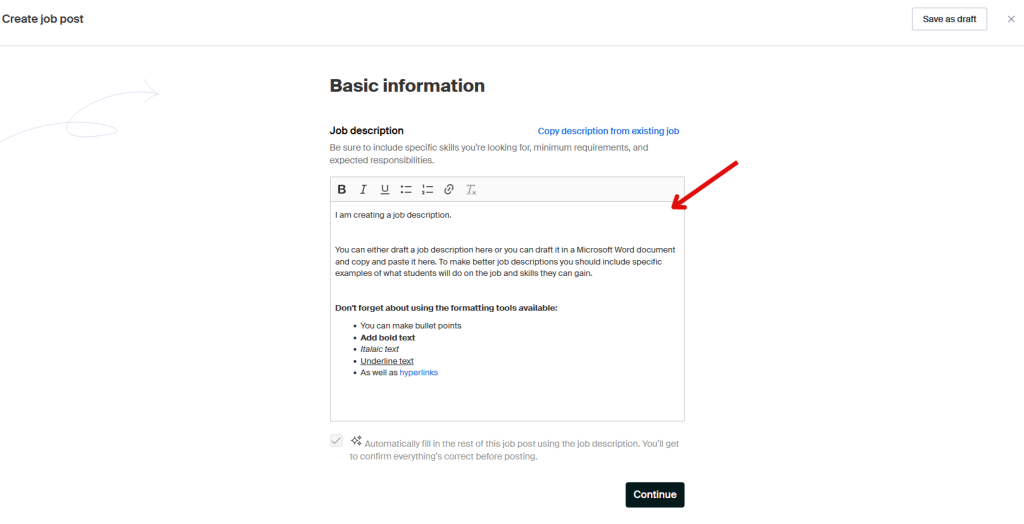
Add your job description to your job posting. You and either draft your job description on this page or you can draft it in a Word document and copy and paste it onto this page. Please take note of the formatting tools to add emphasis to specific parts of your job posting. Some helpful tips are: to make the most engaging job posting consider adding specific job duties the student will be doing on this job, transferable professional skills students will gain in this role, and whether your job has an opportunity for remote work. You can also copy suggestions from other job postings by clicking on ‘copy description from existing job’ to view jobs posted by yourself or other departments and copying the text into this current job description for editing.
Step 4: Create a job title
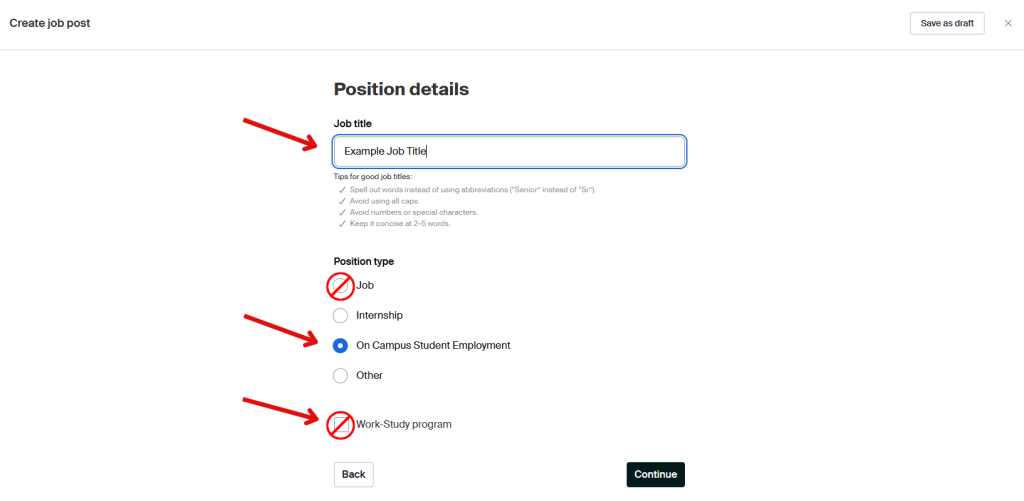
In this step, you will create a job title for your job. Additionally, make sure you DO NOT use the ‘job’ position type. In Handshake ‘job’ is considered full-time or part-time job with benefits. You are posting your job for on campus student employment which is different from jobs and if you post it as a ‘job’ students will not find it. Also, DO NOT use the ‘work study program’ field. Here at K, we do not segment jobs as work study jobs and non-work study jobs. Federal work study is paid from separate accounts than standard on campus jobs allowing any on campus job to be a work study job. If you check the ‘work study program’ box then it will only show up for students who click that box.
Step 5: Add job site location
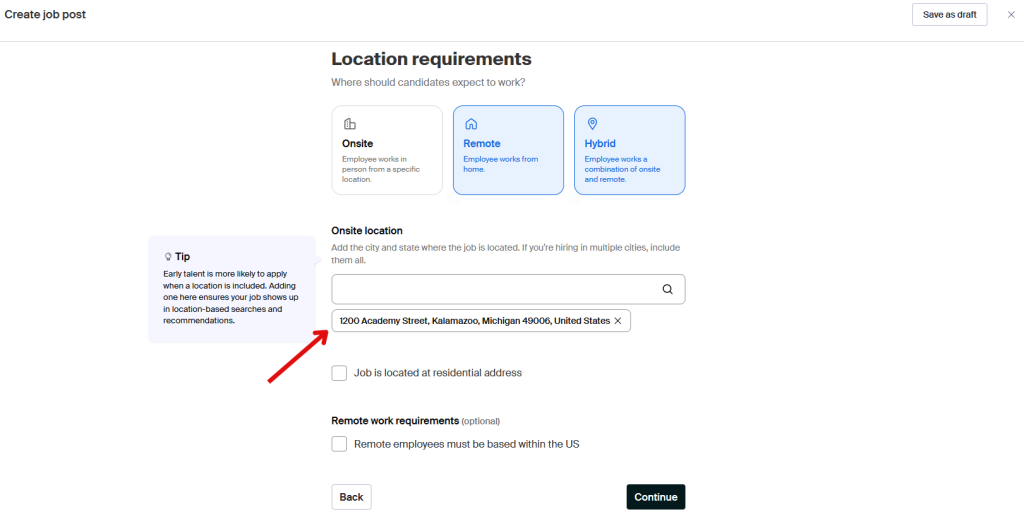
Select if this job has to be done onsite or is allowed to be remote or hybrid. Use the address of 1200 Academy Street, Kalamazoo Michigan 49006 as the onsite location.
Step 6: Select job details
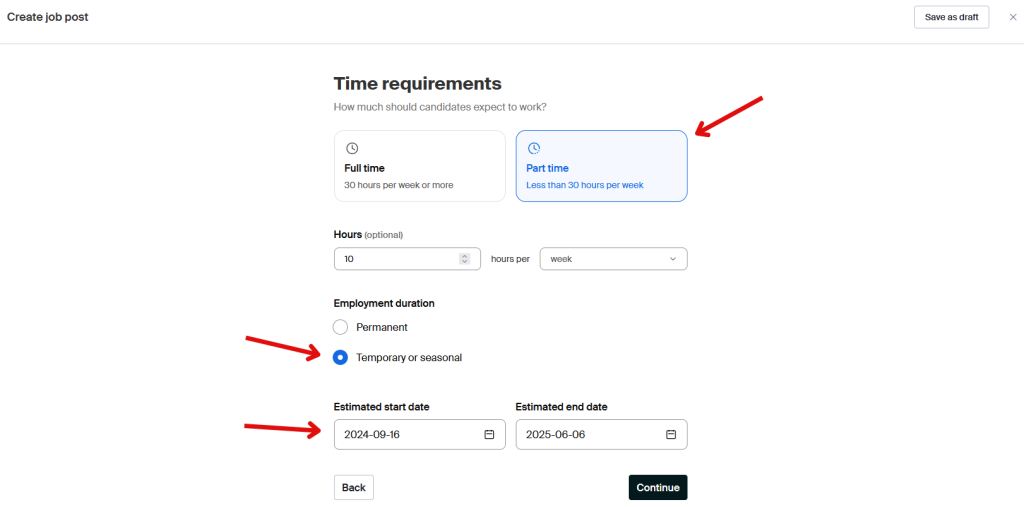
Select part time job as all on campus employment jobs are part time. Select ‘Temporary or seasonal’ as all students work only for the current academic year. If you want to hire them again next year you will have to post a new job and rehire them. Be sure the add the estimated start and end date. For students that will be hired for the full school year the start date will be the first day of classes and the end date will be the last day of classes.
Step 7: Add payment details
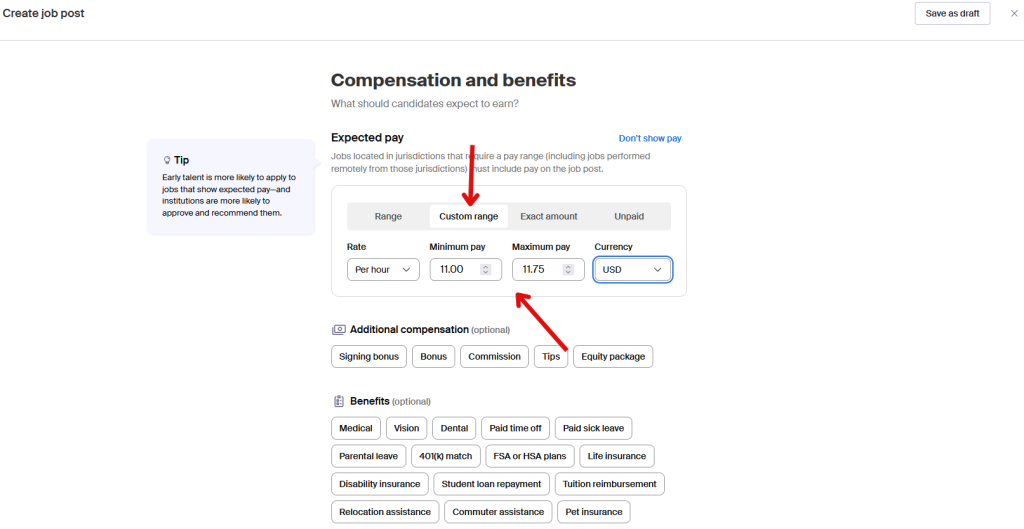
Add the pay rate for the position. Click on ‘custom range’ (you can select these fields) and add the current on campus student employment pay rate, which you can find here under the ‘How much will I get paid?’ drop down.
Step 8: Create job categories
Select a category for your job. Categories all applicants to look for jobs in specific industries or doing specific job tasks. This field is not necessary as students look for all on campus jobs as a group but the page is required. Do your best to find categories that fit your job or use the category in the photo for general office tasks.

Step 9: Add candidate qualifications
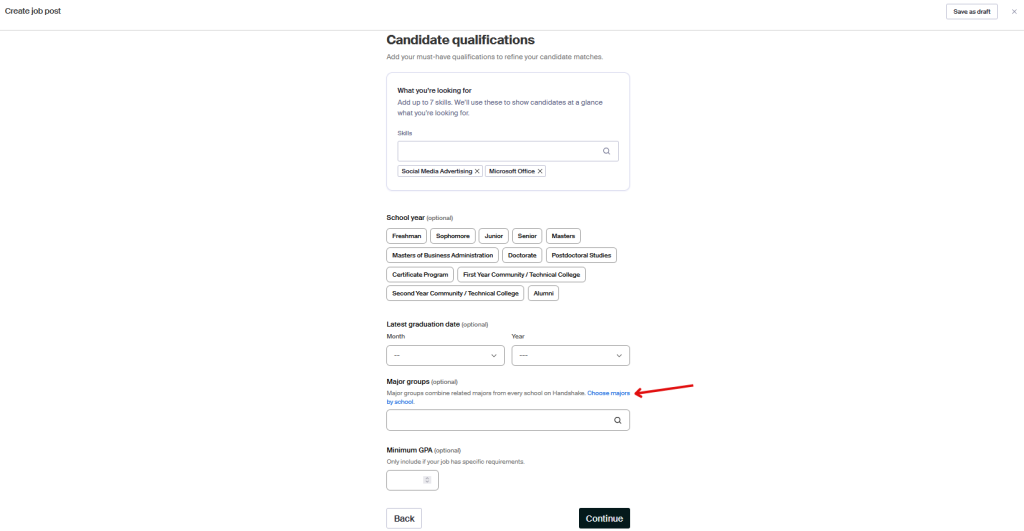
This page allows you to add the qualifications of your ideal candidate. You can select specific class years and/or specific majors, and GPA. If you want to add a specific major as a requirement, click on ‘Choose majors by school’ and then ‘Kalamazoo College’ to select specific K majors. Candidates who do not meet the qualifications can still apply but Handshake will note they don’t fully qualify on the spreadsheet that displays all applicants when the job closes.
Step 10: Chose schools to post job
Add school to post job. Since this is an on-campus job the one and only school should be ‘Kalamazoo College’.

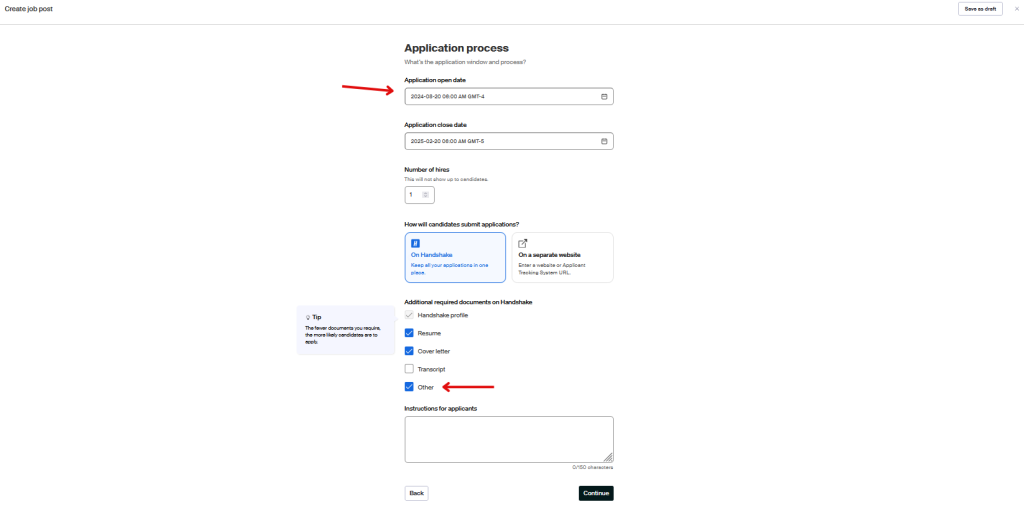
Step 11: Add required documents
Add the duration you would like the job to be open and accepting applications. You can manually close your posted jobs anytime and for any reason. Select the type of documents students should include with their application. At a minimum, all jobs should require a resume but you can ask for a cover letter, transcript, or something else. If you have a document not listed, select ‘Other’ and include a description of what the document is.
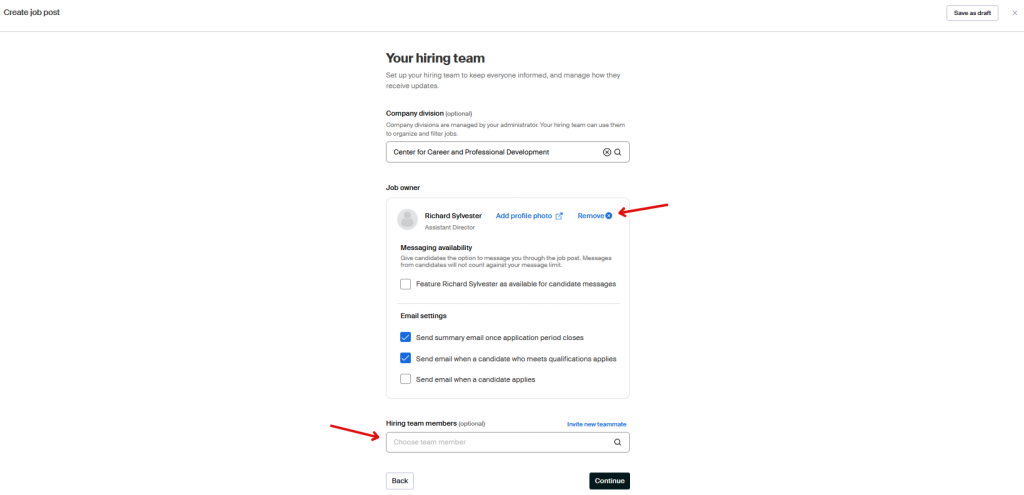
Step 12: Add members of the hiring team who should receive applicant info
You can choose who should receive the application information when the job closes. By default, the job creator will be listed to receive the applicant info when the job closes but you can add additional people. For a person to receive the applicant packet via email, they must have a Handshake employers account at the time the job is being posted. You can also create jobs for someone else to manage and if you would like to remove yourself from the hiring committee click remove to remove your name. Lastly, you can choose to receive application information either all at once when the job closes, or every time a new applicant applies. If you select ‘Send email when a candidate who meets qualifications applies’ it uses the qualifications you selected in step 9.
Step 13: Post job
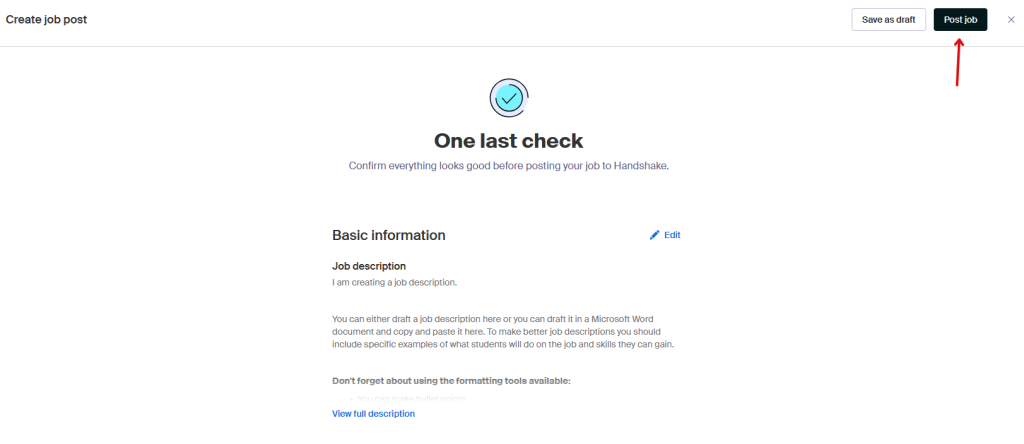
This is the final step. You can see all parts of your job and make any final edits. Once you feel the job is ready to be posted click on the ‘Post job’ button.
